HRmanager User Guide
HRmanager is a desktop app for managing employee and applicant records, optimized for use via a Line Interface (CLI) while still having the benefits of a Graphical User Interface (GUI). If you can type fast, HRmanager can help you manage HR records faster than traditional GUI apps.
Looking to get started?
Here is a quick guide to jump straight to the section you need:
Features
- Viewing help:
help - Listing all employees:
list - Adding an employee:
add - Searching employees by name:
search - Switching the statistics dashboard mode:
stat - Cycle through previous executed commands
- Editing an employee:
edit - Deleting an employee:
delete - Clearing all entries:
clear - Import/Export employee data:
importorexport - Exiting the program:
exit
Other sections
Quick start
Ensure you have Java
17or above installed in your Computer.
Mac users: Ensure you have the precise JDK version prescribed here.Download the latest
.jarfile from the HRmanager releases page.Copy the file to the folder you want to use as the home folder for HRmanager.
Open a command terminal,
cdinto the folder you put the jar file in, and use thejava -jar HRmanager.jarcommand to run the application.
A GUI similar to the below should appear in a few seconds. Note how the app contains some sample data.
Type the command in the command box and press Enter to execute it. e.g. typing
helpand pressing Enter will open the help window.
Some example commands you can try:
list: Lists all employees currently shown in HRmanager.add n/John Doe p/98765432 e/johnd@example.com r/Software Engineer d/Human Resources: Adds an employee namedJohn Doeto HRmanager.delete 3: Deletes the 3rd employee shown in the current list.clear: Deletes all employees.exit: Exits the app.
- Refer to the Features below for details of each command.
Features
Notes about the command format:
Words in
UPPER_CASEare the parameters to be supplied by the user.
e.g. inadd n/NAME,NAMEis a parameter which can be used asadd n/John Doe.Items in square brackets are optional.
e.gn/NAME [t/TAG]can be used asn/John Doe t/friendor asn/John Doe.Items with
… after them can be used multiple times including zero times.
e.g.[t/TAG]…can be used ast/friend,t/friend t/familyetc.Parameters can be in any order.
e.g. if the command specifiesn/NAME p/PHONE_NUMBER,p/PHONE_NUMBER n/NAMEis also acceptable.Extraneous parameters for commands that do not take in parameters (such as
help,list,exitandclear) will be ignored.
e.g. if the command specifieshelp 123, it will be interpreted ashelp.If you are using a PDF version of this document, be careful when copying and pasting commands that span multiple lines as space characters surrounding line-breaks may be omitted when copied over to the application.
Viewing help : help
Shows a message explaining how to access the help page.

Format: help
Listing all employees : list
Shows a list of all employees in HRmanager.
Format: list
Adding an employee: add
Adds an employee to HRmanager.
Format: add n/NAME p/PHONE_NUMBER e/EMAIL r/ROLE d/DEPARTMENT [t/TAG]…
Tip: An employee can have any number of tags (including 0)
Examples:
add n/John Doe p/98765432 e/johnd@example.com r/Receptionist d/Operationsadd n/Betsy Crowe t/friend e/betsycrowe@example.com r/Associate Director d/Finance p/1234567 t/criminal
Parameter restrictions for each field:
Name (n/)
- Characters: The name should consist of only alphanumeric characters and/or hyphens (
-) and/or spaces () and cannot be blank. The name should not contain consecutive hyphens or spaces. The name should not start or end with a hyphen or space. No other characters are allowed. - Case sensitivity: The name entered is case-insensitive eg. adding
John Doewill be invalid ifjohn doealready exists in HRmanager. The name will be stored in Hr manager in lower casing. - Input length: The name must be between 1 and 50 characters long (inclusive).
Phone (p/)
- Characters: The number should consist of only numeric digits. Do not include spaces, extensions or country codes. No other characters are allowed.
- Input length: The number must be between 3 and 16 digits long (inclusive).
Email (e/)
- Characters: The email must follow the format local-part@domain. The local-part may contain alphanumeric characters and
+,_,.,-, but cannot start or end with special characters. The domain consists of labels separated by periods (.); each label must start and end with alphanumeric characters, may contain hyphens (-), and the final label must be at least 2 characters long. No other characters are allowed. - Case sensitivity: The email entered is case-insensitive eg.
john.doe@example.comwill be the same asJohn.Doe@Example.COM. - Input length: The email must be between 1 and 50 characters long (inclusive).
Role (r/)
- Characters: The role should consist of only alphanumeric characters and/or hyphens (
-) and/or spaces () and cannot be blank. The role should not contain consecutive hyphens or spaces. The role should not start or end with a hyphen or space. No other characters are allowed. - Case sensitivity: The role entered is case-insensitive eg. inputting
Software Engineerwill be the same assoftware engineerandSOFTWARE ENGINEER. The role will be stored in Hr manager in lower casing. - Input length: The role must be between 1 and 30 characters long (inclusive).
Department (d/)
- Characters: The department should consist of only alphanumeric characters and/or hyphens (
-) and/or spaces () and cannot be blank. The department should not contain consecutive hyphens or spaces. The department should not start or end with a hyphen or space. No other characters are allowed. - Case sensitivity: The department entered is case-insensitive eg. inputting
Human Resourceswill be the same ashuman resourcesandHUMAN RESOURCES. The department will be stored in Hr manager in lower casing. - Input length: The department must be between 1 and 30 characters long (inclusive).
Tag (t/)
- Characters: The tag should consist of only alphanumeric characters and/or hyphens (
-) and/or spaces () and cannot be blank. The tag should not contain consecutive hyphens or spaces. The tag should not start or end with a hyphen or space. No other characters are allowed. - Case sensitivity: The tag entered is case-insensitive eg. inputting
friendwill be the same asFriendandFRIEND. The tag will be stored in Hr manager in lower casing. - Input length: The tag must be between 1 and 30 characters long (inclusive).
Searching employees by name: search
Finds employees whose names contain any of the given keywords.
Format: search KEYWORD [MORE_KEYWORDS]...
- The search is case-insensitive. e.g
hanswill matchHans - Only one keyword allowed i.e. spaces are invalid.
- Every field is searched (name, phone, email, role, department, tag(s) if any).
- Partial matches are supported. e.g.
Hanwill matchHans - The keyword must be at most
50characters long. - A blank search is invalid and HRmanager will show the command usage message.
Examples:
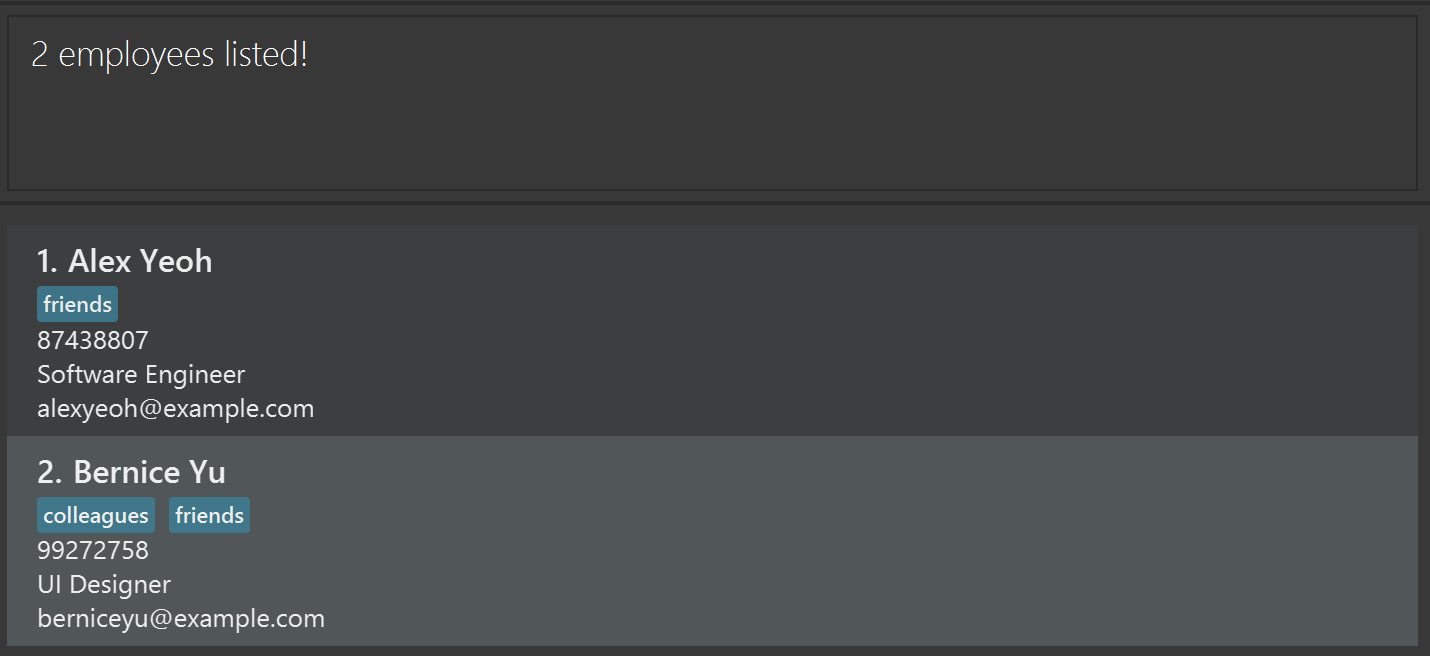
search JohnreturnsjohnandJohn Doesearch friendsreturns employees such asAlex YeohandBernice Yuwith the tag "friends".
search zzzshows0 employees listed!if no employee names match.
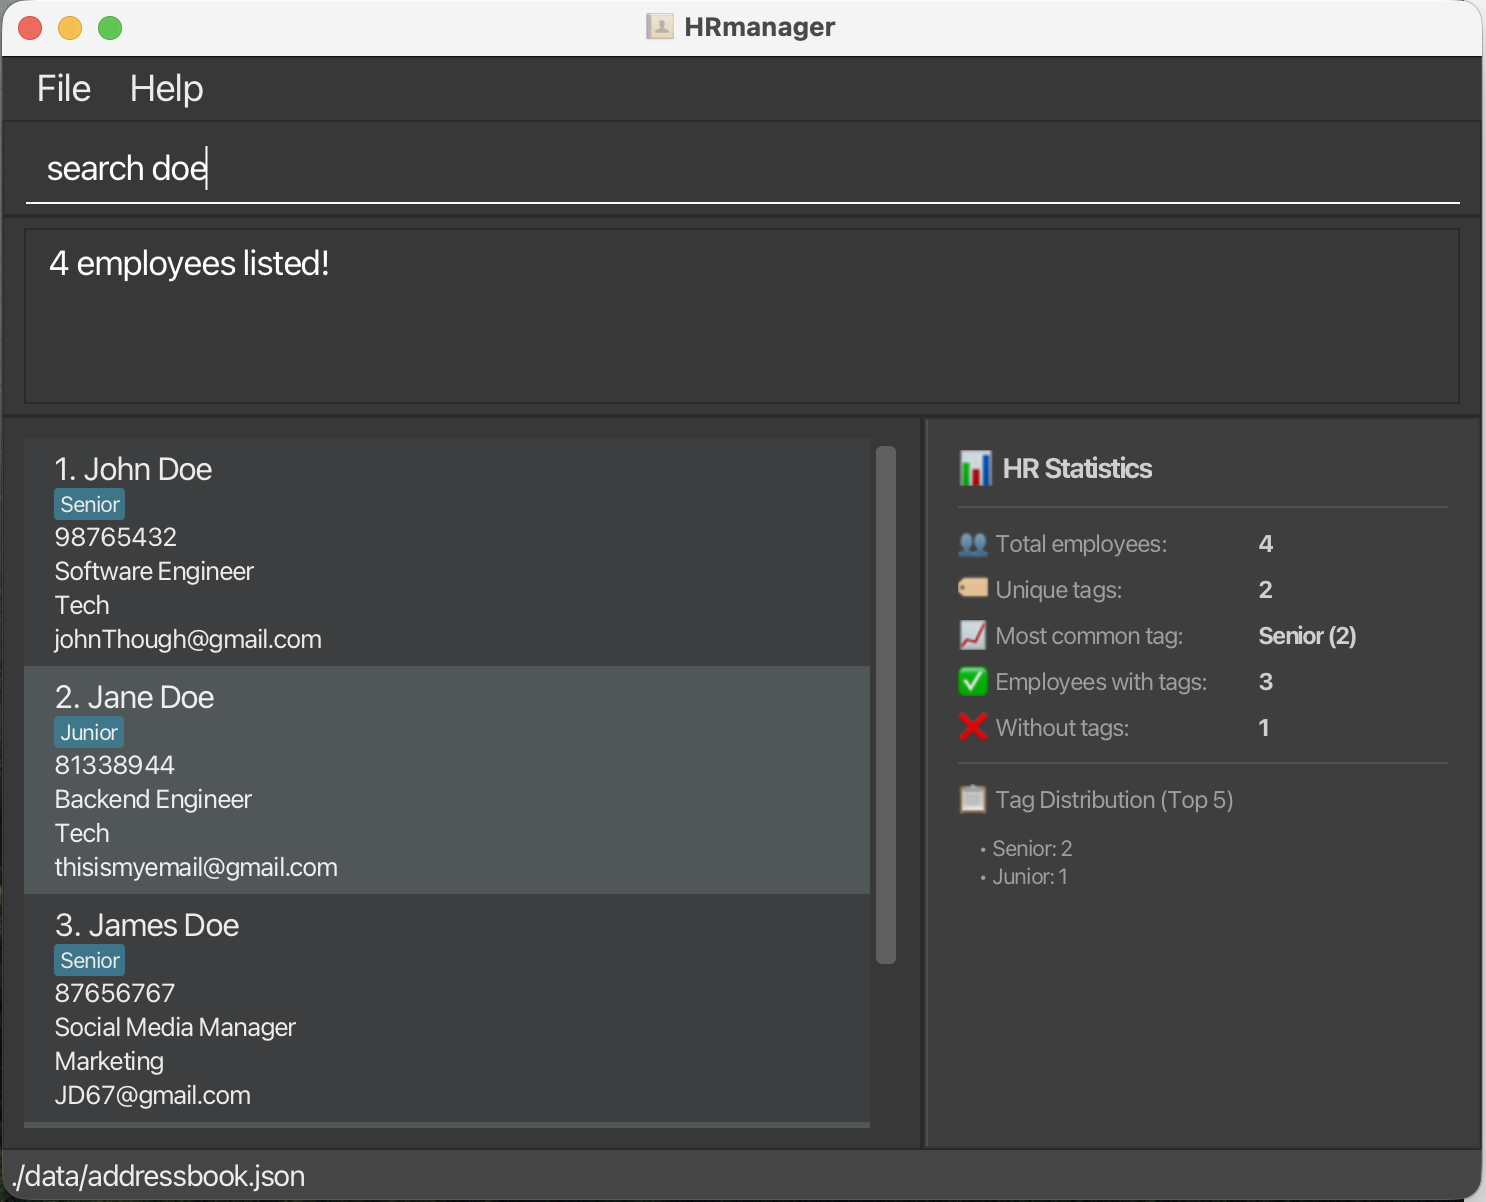
Viewing statistics: stat
Displays real-time statistics about your employee records in a dedicated panel on the right side of the application.
The statistics panel automatically updates as you add, edit, or delete employees, providing instant visibility into your workforce metrics.
Format:
Statistics displayed:
- 👥 Total employees: Total number of employee records
- 🏷️ Unique tags: Number of distinct tags used across all employees
- 📈 Most common tag: The tag that appears most frequently (with count)
- ✅ Employees with tags: Number of employees that have at least one tag
- ❌ Employees without tags: Number of employees with no tags
- 📋 Tag distribution: Top 5 most frequently used tags
Tip: The stats panel is always visible and updates in real-time when you add, edit, or delete employees. No command is needed to view statistics!
Cycle through previous executed commands
You can pre-fill the command box with your last successful command using the PgUp (up arrow) key on computer keyboards. This allows users to repeat their last commands without re-typing it in its entirety.
- Use the PgUp (Up arrow) key to move towards older commands, PgDn (Down arrow) key to move towards latest commands.
- Only successful past commands are saved.
- Up to 5 past commands are saved. Thereafter, the oldest command is deleted to accomodate a new one.
- The current pending command is saved when the command history is explored.
- The latest command will not be saved if exactly same as the previous consecutive one.
Editing an employee : edit
Edits an existing employee in HRmanager.
Format: edit INDEX [n/NAME] [p/PHONE] [e/EMAIL] [r/ROLE] [d/DEPARTMENT] [t/TAG]…
- You will be prompted to confirm the action before the command executes. Enter
yto proceed ornto cancel. - Edits the employee at the specified
INDEX. The index refers to the index number shown in the displayed employee list. The index must be a positive integer 1, 2, 3, … - At least one of the optional fields must be provided.
- Each optional field accepts at most 1 updated value, i.e. no duplicate fields.
- Existing values will be updated to the input values.
- When editing tags, the existing tags of the employee will be removed i.e. adding of tags is not cumulative.
- You can remove all the employee's tags by typing
t/without specifying any tags after it.
⚠️ Confirmation Required: This command requires confirmation before execution to prevent accidental edits. See Confirmation Prompts for details on how to respond.
Examples:
edit 1 p/91234567 e/johndoe@example.comedits the phone number and email address of the 1st employee to be91234567andjohndoe@example.comrespectively.edit 2 n/Betsy Crower d/Marketing t/edits the name and department of the 2nd employee to beBetsy CrowerandMarketing, and clears all existing tags.
Deleting an employee : delete
Deletes one or more employees using the index numbers shown in the currently displayed list.
Format: delete INDEX [MORE_INDEXES]
Alias: del
What this feature does:
- Removes one or more employees permanently from HRmanager.
- Works on the employee list that is currently shown on screen.
- Supports deleting several employees in one command.
⚠️ Confirmation Required: This command requires confirmation before execution to prevent accidental deletion. See Confirmation Prompts for details on how to respond.
Additional constraints:
- At least one index must be provided.
- Each index must be a positive non-zero integer:
1,2,3, ... - A maximum of 100 indexes can be supplied in a single command.
- Indexes are based on the current displayed list, not on a hidden or previously shown list.
- If any supplied index is out of range, the deletion fails and no employee is deleted.
- Repeated indexes are accepted, but duplicate indexes are ignored internally.
Examples:
delete 2deletes the 2nd employee in the currently displayed list.del 4deletes the 4th employee using the alias.listfollowed bydelete 1 3 5deletes the 1st, 3rd, and 5th employees in the full list.search Betsyfollowed bydelete 1deletes the 1st employee in the filtered search results.delete 3 1 3deletes the employees at indexes3and1; the repeated3is ignored.
Successful delete command output:
PNG placeholder: Insert a screenshot here, e.g.
images/delete-command-placeholder.png
Clearing all entries : clear
Clears all entries from HRmanager.
Format: clear
⚠️ Confirmation Required: This command requires confirmation before execution to prevent accidental data loss. See Confirmation Prompts for details on how to respond.
Import/Export employee data : import or export
Exports the current list of employees into a CSV file, saved into user-specified local destination.
Format: export [FILE PATH]
Exiting the program : exit
Exits the program.
Format: exit
⚠️ Confirmation Required: This command requires confirmation before execution. See Confirmation Prompts for details on how to respond.
Other features
Confirmation Prompts
Since HRmanager stores sensitive employee data (personal information, contact details, role assignments, and department information), certain commands that permanently modify or delete this information require your explicit confirmation before they execute. This safety mechanism helps prevent accidental data loss or unintended changes to employee records.
Commands that require confirmation:
edit- When editing an employee's informationdelete- When deleting one or more employeesclear- When clearing all entriesexit- When closing the application
How confirmation works:
- After you enter one of the above commands, a confirmation prompt will appear displaying:
- The action you're about to perform
- The impact of this action
- You must respond with either:
y- to proceed with the commandn- to cancel and discard the command
- If you enter anything other than
yorn, you will be asked to enter a valid response.
Example:
> delete 1
Please confirm this action. Enter 'y' to proceed or 'n' to cancel.
Action: Delete 1 employee(s)
Impact: Permanently removes employee(s) from HRmanager

> y
Employee deleted successfully
Tip: This confirmation step is designed to prevent mistakes. If you accidentally type a command, simply enter n to cancel it without any changes being made to your employee data.
Saving the data
HRmanager data are saved in the hard disk automatically after any command that changes the data. There is no need to save manually.
Editing the data file
HRmanager data are saved automatically as a JSON file [JAR file location]/data/HRmanager.json. Advanced users are welcome to update data directly by editing that data file.
Caution:
If your changes to the data file make its format invalid, HRmanager will discard all data and start with an empty data file at the next run. Hence, it is recommended to take a backup of the file before editing it.
Furthermore, certain edits can cause HRmanager to behave in unexpected ways (e.g., if a value entered is outside the acceptable range). Therefore, edit the data file only if you are confident that you can update it correctly.
FAQ
Q: How do I transfer my data to another Computer?
A: Install the app on the other computer and overwrite the empty data file it creates with the file that contains the data from your previous HRmanager home folder.
Known issues
- When using multiple screens, if you move the application to a secondary screen, and later switch to using only the primary screen, the GUI will open off-screen. The remedy is to delete the
preferences.jsonfile created by the application before running the application again. - If you minimize the Help Window and then run the
helpcommand (or use theHelpmenu, or the keyboard shortcutF1) again, the original Help Window will remain minimized, and no new Help Window will appear. The remedy is to manually restore the minimized Help Window.
Command summary
| Action | Format, Examples |
|---|---|
| Help | help |
| List | list |
| Add | add n/NAME p/PHONE_NUMBER e/EMAIL r/ROLE d/DEPARTMENT [t/TAG]… e.g., add n/James Ho p/22224444 e/jamesho@example.com r/Software Engineer d/Engineering t/friend t/colleague |
| Search | search KEYWORD...e.g., search James |
| Stat | stat MODEe.g., stat dept, stat tag |
| Cycle commands | up/down arrow keys |
| Edit | edit INDEX [n/NAME] [p/PHONE_NUMBER] [e/EMAIL] [r/ROLE] [d/DEPARTMENT] [t/TAG]…e.g., edit 2 n/James Lee e/jameslee@example.com d/Finance |
| Delete | delete INDEX [MORE_INDEXES] or del INDEX [MORE_INDEXES]e.g., delete 3, delete 1 4 5 |
| Clear | clear |
| Import | import [FILE PATH]e.g., export C:\Users\John\Desktop\employees.csv |
| Export | export [FILE PATH]e.g., export C:\Users\John\Desktop\employees.csv |
| Exit | exit |